With this making lab, you will discover some aspects of light, while building a real scientific instrument – namely, a spectroscope. This is a basic astronomical tool, which allows us to study the chemical composition and the physical state of the celestial objects we observe. Obviously, the spectroscope you will build is not exactly like those used by astronomers in order to observe the stars, but it does work well, and will enable you to break down the light of surrounding sources into a rainbow of colours. You will discover a few features of the light sources around you, which otherwise you would not manage to see. It’s your own portable instrument, which you can use whenever you like, at home, or walking around, in order to hunt for spectra!
Before we start, let us try and understand the nature of a spectrum.
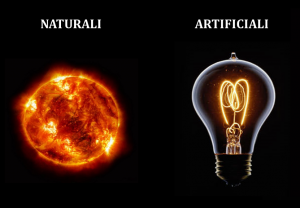
The light is a form of energy which allows us to see what is all around us. The bodies which «produce» light are called «light sources» and can be either natural or artificial.
The light seems to us white (or rather, transparent), but is actually composed of all the colours of the rainbow, mixed together. We realize that all objects have a colour only when light (be it natural, or artificial) hits them, and is partly reflected, and gets into our eyes. For example, if you have a red object in front of you, you see it red because the light hitting it is all absorbed, apart from the colour red, which is reflected, enters your eyes and is shown as such. The same happens for the other colours, apart from black and white, which are actually not real colours, but rather absence of colour. In the case of black (because the light hitting the black object is completely absorbed), and white (which reflects all the colours of light). You will therefore understand why during the summer it is better to wear light-coloured clothes!
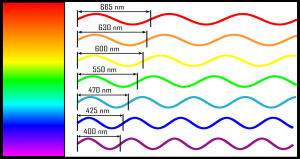
Here you can see coloured waves, representing the waves carrying various colours. The distance between two crests (or between two troughs, or two starts of the wave shape) is called wave length, which is an essential feature of light. Each colour has its own wavelength, from the shortest (violet) to the longest one (red). The unit of measure indicated beside the number is the nanometre (whose symbol is “nm”), which is a billion times shorter than the metre.
Passing from violet to red, as you can see, the wavelength increases, and in the same space fewer waves “are in”, just because a complete cycle occupies a smaller space. One could make an analogy with water drops falling into a glass: each time there is a “peak” of the wave, one could imagine that it transfers a “fixed” quantity of energy… as if it were a drop of water falling into a glass. In a given time, the blue light carries more drops of the red light. Namely, the blue light carries more energy than the red light.
As a general rule, within light, all colours are mixed and indistinguishable. In order to put order in the colours of ligth, we need to separate them. We might use a small water drop (does it remind you of anything?), a shard of crystal (you know those crystal-drop chandelier of you grannie?) or a “piece of glass” called prism.
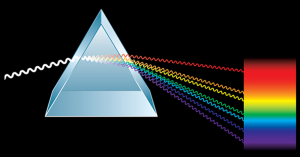
A prism is a transparent object, as you can see in the picture on the left. The (white) beam of light enters and is refracted (this is a rather difficult word, I realize, but this is actually the physical phenomenon which takes place: refraction). What’s happening? Each light colour is diverted, as it enters in the prism, whch depends from the wavelength of the colour itself.
As you can see, the red waves are less deflected than the violet ones. The same happens when the light rays come out of the prism. In this way, the light coming out of the prism is no longer white, but rather a bundle of well-ordered colours, from red to violet: a rainbow! The light rainbow is its spectrum. You will see with your own eyes (thanks to the spectroscope) that not all lights manage to compose a rainbow.
Let’s start building up the instrument which will allow you to hunt for spectra. Here are the materials you need:
- scissors, ruler, ball-point pen, tape, glue, black cardboard A4 size, CD or DVD (any type: new/recorded/video, but in case, its surface must be cleaned);
- a printout of the sheet you can download at this link;
- a cutter (or utility knife) which must be used by an adult, because it might be dangerous.
As you can see, we do not have a prism available, but I assure you it will be all the same. In this case, we shall take advantage of another physical phenomenon, namely: diffraction, which you will study at school in the next few years.
First of all, attach the printout of the spectroscope upon a black cardboard. It must be black, since the inside of the spectroscope we are going to build should not reflect the light. Preferably use a glue stick, and spread a light layer (so as to avoid lumps on the paper).
Cut with your scissors the shape along the solid lines of its edge. Remember, do not cut along the dotted lines.
Now you need the help of an adult, just for a few minutes. Can you see two small narrow and long slits? You need to cut them out with a cutter (or utility knife), in order to create two thin slits (as indicated). The cuts should be precise, along the lines, and straight.
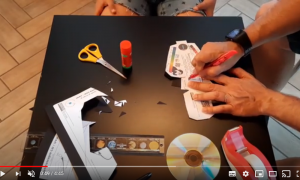
At this point, we should fold the cardboard along the dotted lines you can see. You should fold it very accurately. I’ll tell you a trick: take a ruler and place it next to the dotted line. With a ball-point pen (the colour does not matter, as long as it has the tip of a pen), go back and forth 5 times, pushing on the cardboard. You will see that, in the end, when you fold the cardboard, it will be perfectly folded. Do the same for all the dashed lines, both with short and mixed hatching (the two side flaps).
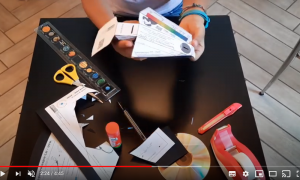
Now fold the cardboard. Where you see short hatching, fold the sheet down. On the other hand, fold up the two flaps (mixed hatching).
Prepare a strip of tape of about 5 cm. Close the small box at the two flaps, and put the tape under the slit (please do not cover it) so that the box is tightly closed. If you have doubts, have a look at the video with the assembly instructions, at the end of this page.
Prepare a strip of tape of about 10 cm.
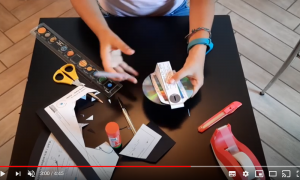
Now take the CD/DVD, and stuck your finger in the central hole, holding the reflecting side upwards. Then insert the CD/DVD in the box, as if it were the beak of a duck who wants to eat it.
The small tab should hold the CD/DVD. On the underside, pull the cardboard towards the tab and use the tape to hold them together, starting from the tab down to the piece of cardboard, under the box. Attach two strips of tape on the side flaps too, so that they are well fixed on the CD/DVD, without letting light in.
Check that there are no openings from which light might enter in the box, apart from the two slits.
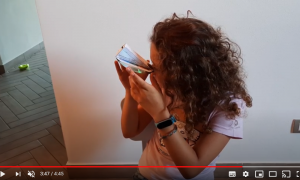
Now that you have built your instrument, let’s see how you can use it. One of the two slit is marked “eye”. Turn to a light source, as for example the light of the room you are in. Hold the CD/DVD with either one or two hands, as you like, in front of you, and incline it about 45 degrees, with the slit labeled “eye” towards you. Put your eye to the crack and look inside the spectroscope, toward the surface of the CD/DVD. You shoudl see the light spectrum you are observing. If you do not see it, incline the CD/DVD slowly, until you find it!
The Sun is a very simple light source you can observe: however, you should not point the spectroscope straight at the Sun, bat rather at the sky (be it blue or cloudy).
While hunting for spectra, you will see that, if you use the spectroscope with energy-saving light bulbs, you will not see the rainbow, but rather a few coloured lines, on a black background. They are spectral lines, different from the rainbow, which is called continued spectrum of light. The light, in this case, is emitted by different physical processes. Indeed, while in the case of a normal light bulb (or the Sun), the light is emitted because the source is very hot (thousands of degrees), in the case of the energy-saving light bulb there is a (cold) gas whose electrons, which normally orbit at a certain distance from the nuclei, are excited, jump upon farther orbits, and later fall back upon the original orbit. In doing so, they emit light! However, the light they emit depends on the difference of energy between the two orbits, and therefore has a definite colour, which represents the energy of that jump.
Each gas, from any chemical element, has its own electrons, which are more or less far away from the nucleus, and can only make certain jumps. Therefore, the spectrum of a gas (namely, the coloured lines emitted by the electrons of that gas, while jumping) is typical of that gas. It has a specific behaviour and has those coloured lines. In this sense, we can say that the spectrum is the fingerprint of that gas, of that element. If we see certain lines, we can identify which gas has emitted them. Do you understand why it is important to watch the stars with a spectroscope? Indeed, it allows us to understand what they are made of.
Actually, this instrument is much more powerful: not only does it enable us to understand which elements constitute the astrophysical source; we also manage to infer its temperature, the gas density, and whether it is approaching or moving away from us!
This laboratory is based upon a concept of Arvind Paranjpye (Inter-University Centre for Astronomy & Astrophysics – India), adapted by Association GAPPIC (Groupe d’accompagnement pédagogique du Pic du Midi) and translated once again from Italian (Luciano Nicastro, INAF) into English by Giuliana Giobbi (INAF).
Watch the video with the assembly instructions (in italian)
