A teaching activity planned by Biagio Ambrosio and Anastasiia Plotnikova during the PhD course “Designing innovative public engagement activities” held at the University of Padua in 2022.
Build a galaxy in a bowl full of water and print its image on a sheet of paper, so that you can admire it when you want!
Materials
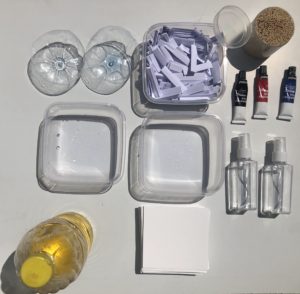
- one container for water
- containiers for oil paints
- spray bottle for oil
- toothpick
- flour
- oil paints
- oil
- carpaper (watercolour paper is the best, but also normal paper is fine)
- printed images of galaxies
- paper napkins
- sticks made with a folded sheet of paper
Description of the activity
PREPARATION:
Thickening agent (to be prepred before the start of the activity):
Take the pan, put 300 ml water and 10 tablespoons of flour. Blend the ingredients until they reach a smooth consistency and boil the mixture while stirring. Turn the stove and keep stirring for 30 seconds. Let it cool. Mix the thickening agent with water: 2-3 tablespoons for a 100-200 ml container.
Oil paints:
Mix oil paints with oil, so as to achieve a thinner consistency. Put the black/brown colour in the spray.
Paper:
Cut an A4 sheet in 4 equal pieces. For each piece, fold 1-2 cm strips on the 2 opposite sides. You will obtain a smaller sheet with ‘wings’ to lift it. From now on, this will be our sheet.
EXPERIENCE:
Put 1 cup with red, 1 cup with blue and 1 spray for 2 water containers. Give 1 paper stick and one sheet of paper to each person.
In order to build the galaxy pour the spray in the container as dust, pour also blue drops (hot stars) and red drops (cool stars).
In order to show gravity, take the toothpick and spin the liquid into the container.
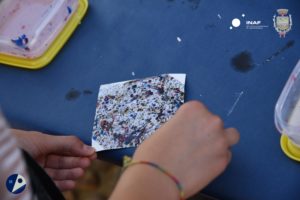
While the liquid is spinning, take a sheet of paper and put it on the surface for 1 second, then pull up. Do not blend, wait for 30-40 seconds in total. Now you can mix.
The galaxy appears on the sheet!
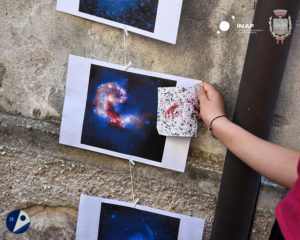
You can compare your galaxy with images of real galaxies.
The experience can be repeated many times by participants, so as to create different galaxies. Participants may also compare galaxies among them, see how they are similar and different. Once the experience is concluded, each participant an bring homethe galaxies he/she has created, once the colour is dry.
Explanation of the physical process
How is the galaxy formed in space?
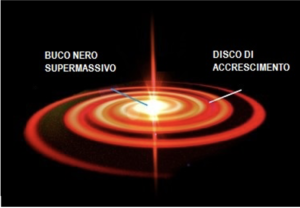
In general, when any object is formed in space, we must have matter and a force acting on matter, so that it becomes more compact and forms a body. Gravity is a very important force in space, and materials consist in gas and dust. Then the formation process begins. The name of the process is accretion. Here are the main features of accretion:
1) The center, where the main quantity of matter is concentrated, which attracts all the other matter, which collapses with its gravity. In the galaxy, this is the black hole – a massive spherical object, the last stage of stellar evolution.
2) Formation starts around the center and creates a disk structure, whose name is accretion disk. From the disk, matter moves towards the center, getting closer to the center.
The galaxy
Main features:
For all galaxies:
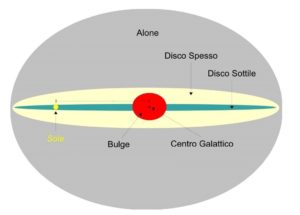
1) Center – black hole.
2) Disk made of gas, dust and stars.
3) Halo – a spherical structure around the disk, where few old stars and stellar clusters can be found.
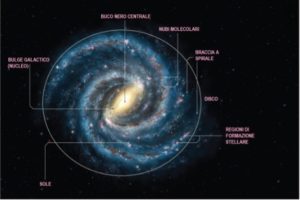
For spiral galaxies:
4) Spiral arms – spirals of gas, dust and stars, from the edge of the galaxy to the centre
5) Bar – spherical (cilyndrical) structure around the center, where the spiral arms are connected.
6) Bulge: large group of stars placed in the central area of the galaxy
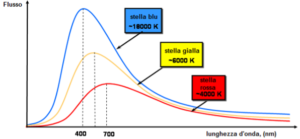
Star Colors
The star color is the wavelength where the peak of its emission can be found. The longer the wavelength, the redder the star. For stars with higher temperatures, the peak can be found at a shorter wavelength, and as a consequence, the color is bluer.