With this simple code realized with Scratch, you will be able to view (and hear) a message in binary code, as the one sent from Arecibo on 16 November 1974 and described in this activity. Let us see how to realize it, step by step.
First of all, from the interface of Scratch, draw a new sprite (better square and small): this will be your bit. Give it the colour you prefer: the main thing is that it may be seen against the background that you will choose. In our project (which we invite you to open, look inside and remix it) is a 4-pixel thick white square, on a space background from the library of Scratch.
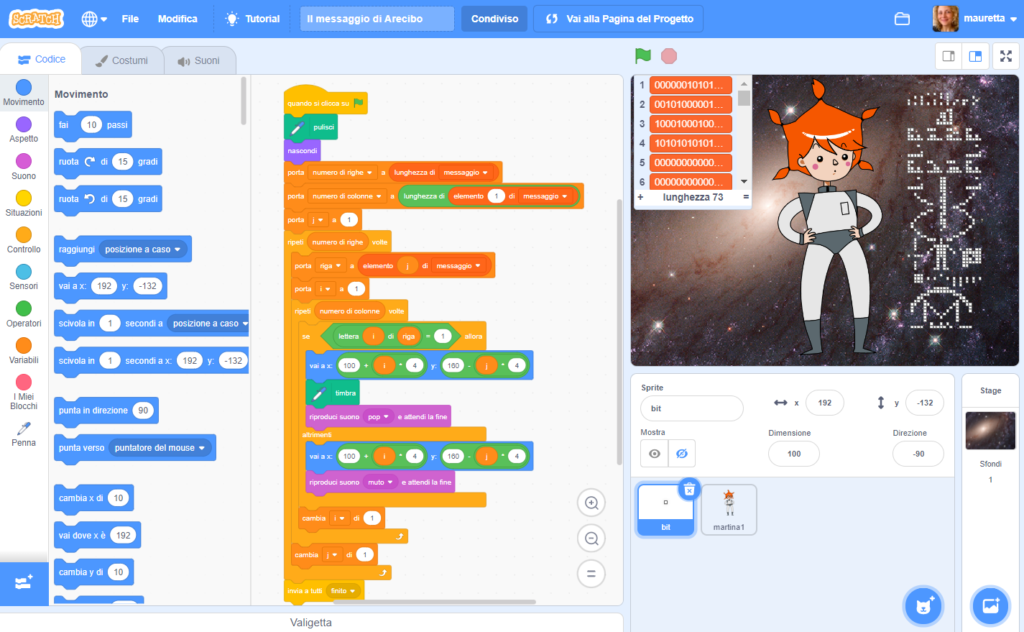
As we were saying, the sprite represents the bit which, thanks to the command stamp, which is repeated on the stage, when it assumes the value 1 in the message. At first, since we still do not know what the message will be, we hide it.
The message to reproduce (the Arecibo one, in this case) is recorded in a list, which is here defined as “message”, and has been filled by importing the data from an external file. In order to do this, we define the list, which will be viewed on the stage, and will be initially empty. Just right-click on the list which appears on the stage and, in the pop-up menu now appearing, select “import”. Choose the file from which you can import data (this will be a text file with 0 and 1, organized so as to compose the grid of the message) and, clicking on “open”, the list is filled with 0 and 1 organized in the same way: it will have as many elements (lines) as the lines of the message, and so many elements in each line as the columns of the message grid.
In the first part of the code, the initialization of two variables appears: “number of lines” and “number of columns”, whose value is established by the programme itself, using two operators, one on the lists, and one on the strings (sets of characters, in this case the figures 0 and 1).
The heart of the programme are two cycles, one inside the other. The most external one (slower) runs along the lines; the internal one (quicker) flows on the columns, that is to say on the single bits of each line of the message. Therefore, for each line of the messagw, if the bit (i element) is 1 , then “stamp” the sprite on the stage and emits a sound, otherwise (if it is 0), it emits nothing for the same length of time. In this way, the square pixel will appear (and you will hear the sound) only when in the message the bit is 1.
The most complex part of the code is perhaps to decide where bit/pixel appears. Here we have chosen to start up on the right, at the coordinates (100,160) corresponding to the first iteration of the cycle (indexes i and j equal to zero). As i varies, the implemented formula runs on the right by 4 pixels, so as to avoid that bits overlap. As j varies, it runs at the bottom by 4 pixels, for the same reason.
By clicking on the green flag, you will see the message appear on the right, beside Martina, and you can even listen to it.
If you want to try and view another message, you simply need to import the text file with the binary message, as described at the start.


